Wednesday, February 9, 2022

My New Sewing Room

DISCLAIMER: So, this post was supposed to go up in 2018.SO much has changed since then (and not just being in a pandemic). I decided to publish this anyways, because I wanted to get this blog going again. I have lots more to update, but please enjoy some pretty pictures from when I had a clean sewing room (in a house I no longer live in)

I have been away from blogging for a long time, and I don't know that I can do it regularly, but I know I love having a place to store all my sewing memories, and a way to share the hobby I love with others, so I'm gonna keep this ol' page limping along :) I wanted to start by sharing my "new" sewing room.


We moved a year and a half ago into a home out in the country (we're about 20 minutes from a "real" town). The new house has a huge room upstairs with a half wall that overlooks the living room. It serves as both an entertainment room for the kids and my office/sewing room. Here's a fuller shot of the room.


One side has the entertainment center/couch, one side has my wall of fabric and machines, and my computer is in the middle. There's not much natural light like the rest of the house has, so I put in track lighting. It may not be the prettiest, but it's super functional. Right now the power cord hangs down from the ceiling, but my husband is going to wire it through the walls to a switch.


My favorite part is this side of the room, of course. I bought 3 wooden shelving units from Ikea. Two have glass doors and drawers in them. Together they are about 108" wide. I thought a whole wall of floor-to-celing fabric storage would be enough, but that wasn't the case. There is "overflow" over in the corner by the entertainment center, as well as along the half wall that overlooks the living room downstairs. (There may also, ahem, be some hidden in totes under my daughter's bed)


Sunday, October 22, 2017

Sew What Do I Wear? blog tour

If you've popped over for the blog tour, welcome! If you're an old sewing friend and you're just checking to see if I'm still alive, thank you!!
  

I thought this "Sew What Do I Wear - Professional Edition" blog tour would be a great chance to breathe some life into this poor neglected blog of mine. Even better, it was a great excuse to finally make some clothes that have been on my to-do list for too long.

First up was a pair of SOS Knit Pants by Patterns for Pirates. I made size XL in black ponte knit, with a 30" inseam. I did the pockets in the back and the pockets in the front. Even if my husband had been a more willing photographer, neither one of us has the skills to make details of black pants show up well, so you'll have to take my word that they look great. These pants feel like pajamas (glorious!) but are definitely sharp enough to wear to work and have the details that make them look store-bought. (And the pockets that make them useful!)


If you're on the fence about why you would ever want to make yourself a wardrobe staple like basic black work pants instead of buying them, you should know that there is nothing more comfortable than custom-made pants. Store-bought pants fits me close enough, and I always think that's good enough...until I make myself a pair. These are like wearing butter (if that could ever be comfortable).


This is the face I make when I think about wearing store bought pants.

The striped shirt turned out a bit, um, loud? Clownish? Regardless, I'm going to wear it a ton. Because it's comfortable as can be. It's made out of an ITY knit, which means it feels kind of silky. I consider ITY a "dressy" kind of fabric, and I love it for work clothes because it's comfortable in warm weather (I live in the South) even though it's typically a polyester blend. It feels nice in the winter too :)


This is the Relaxed Raglan with Add-Ons from Patterns for Pirates. It was the original raglan pattern and is looser than the slim fit raglan. The ITY is drapey enough to show my waist on days when I am shapely, and the raglan is relaxed enough on days when I am not as pleasantly shaped :) My favorite part is the cowl.


The cuffs and cowl are made out of a rayon blend knit and they are ridiculously soft. Like, I want to snuggle my face in it all day soft. The cowl is the reason I will probably wear this shirt all the time, even if I didn't end up loving the print after all. At least, until I make a few more shirts with cowls and this one can come out of rotation.

Thanks for stopping by! Be sure to check out all the other awesome bloggers on the tour!


Sunday, July 31, 2016

I'm Such a Trendsetter!

It's going to seem like I'm jumping on the Pokemon Go bandwagon, but all the hubbub about the game has just reminded me that I never posted my makes from Danielle's Pokemon themed birthday party. Her birthday was in April, so I'm going to go ahead and take credit for making Pokemon huge again, k?


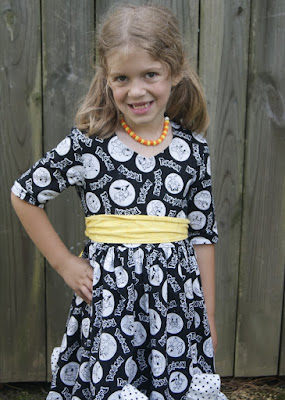
Danielle is getting older (she's 7 now!) and she didn't want "poofy" sleeves. She still likes some ruffles and adores a good twirl, but her birthday dress this year was a bit tamer than previous years (see birthday #4 and birthday #5). I made the Candy CastlePrincess dress pattern with 3/4 sleeves. I used two different Pokemon prints and Danielle *perfectly* accessorized it with a Torchic inspired necklace (one of the activities we did at her party). She also did her own hair, and I think it looked cute :) (We did pictures after the party so it's a bit messy, don't judge)

This is Torchic (Pokemon wikia)

The dress was an easy make and fit well. I bought a Babylock ruffler for my machine (I've had bad luck with the two generic rufflers I bought when I used a Janome), and it got a little fussy with me. I don't remember exactly what happened, but I had a very long strip of ruffle and had to go back and re-gather a few bits. Oh, and I had to squeeze the ruffle out of the piece of white with black polka dot fabric I had, so I may have cheated and gathered it a bit more and a bit less in some places. Besides that mess, everything went together really easily.


Little brother got a custom shirt in the party theme. I used the Mac's Monster Tee pattern from Cole's Corner and Creations and I LOVE how it turned out!

The non-Pokemon parts are plain black cotton lycra


I've seen raglan shirts made for boys with a mix of woven and knits (the front of the shirt is made from woven and the rest from knit), but I didn't want a solid shirt panel. Plus I wanted to find a way to use both Pokemon prints. I made the shirt according to the pattern--the only changes I made were to use a woven fabric for the lower front panel, and to add a woven pocket (piece from another pattern). I don't sew for my boy enough and he was very happy with his new shirt.


Beside the clothes, I also "made" a cake (some poorly frosted cupcakes shaped like a Pokeball) and we played a few games. Girls seem to like activities more at their parties than boys do. It was a fun day and I loved seeing both my kids in mama-made.

My favorite birthday picture is always the "cake face" one :)

Wednesday, March 2, 2016

More Makes

Here is another wrap up post of things I made and never blogged about!


I made this super cute shirt for Samuel about a year and a half ago. It's unfinished in this picture, but the main details are there. It's the Mac's Monster Tee pattern from Cole's Corner and Creations. The shirt has a curved yoke which is great for colorblocking but also leaves the perfect space for applique. I chose to do an Olaf face. It's not available in the pattern, but there are a lot of great choices. I currently have two (short sleeved versions) of these tees cut out for Samuel and his best friend for the summer.


This sweet doll is the Doodley Doll Zoey pattern from Embroitique. I combined elements of several faces together to make the embroidery file for the face I wanted. I didn't read the directions very well and ended up sewing the hair right sides together and flipping it out, instead of sewing it with wrong sides together and raw edges, but I prefer my "mistake".  I wanted to use a woven for the headband instead of felt, so I cut two pieces and stitched them together to get edges that wouldn't fray. I do love using fleece for dolls (I used it for her hair, shoes and collar)--it doesn't fray and I have lots of scraps from other projects.


The jumper that matches is the Perfect A-Line Dress (which is reversible) from Tie Dye Diva. This was for a sweet friend whose mama picked out the fabrics. The doll is to match her little girl, who doesn't have a lot of options for dolls who look like her. I used remnants from the jumper to make the doll's outfit and was thrilled with how this turned out.


I mostly sew clothes, but the doll above was a nice change of pace. So was this cake I made for a co-worker whose name is Bob. We build data models and tools, so his nickname is "Bob the Builder". We bring in a cake for the birthday after us, so when I was responsible for his birthday, I knew I had to make a Bob the Builder cake! My mom took a cake decorating class way back when and passed down the basics to me. This is just a Wilton shaped pan, and I used the Wilton icing recipe along with some of the gel colors to make the black and bright orange-red. It was fun, but took hours. Next year I'm bringing in a traditional cake :)


Finally, here are my cuties in a more recent project--the Night Before PJ Pants from Cole's Corner and Creations. They sew up super fast (there are no side seams) and miraculously fit both my slim girl and my big bootie boy. There are options for cuffs or ruffles, and several different lengths. This is definitely going to be a staple in my kids warddrobes!

Sunday, February 21, 2016

A Lot of Catch Up

There has been a lot of sewing that I haven't gotten around to blogging in the past couple years. I intend to try to blog in detail about some, but wanted to share some of the others briefly.


This was an outfit that I made my daugther for the 4th of July in...2014 (don't judge). I used denim for the shorts and lengthened them about 4 inches. They're super cute, just designed to be a little shorter than I prefer. They're the Lucy shorts from Made from Mermaids and I love how simple, yet cute, they are. The shirt was RTW and I embroidered it with the Star Spangled Cutie design from Planet Applique.


This pretty maxi dress is the Lily Lace dress and romper from Made for Mermaids. I think the back is beautiful, but we don't really do open backs, so this went to a sweet little friend of ours. She's the same size as Danielle so her younger sister usually gets our handmade-me-downs. She was so excited to receive it :)


Here's my goofy girl with my goofy dad :) This is a pajama top I made by using the Miss Mary Mack Tunic pattern from Love Notions. The ice cream fabric was from Hancock Fabrics "spot the bolt" table. It did not feel nice at all before I washed it, but it was so soft and comfortable afterwards. And it was a steal for less than $2/yard! It'll make it's appearance again in summer PJs.


This is the free Izzy top pattern from Climbing the Willow. I didn't want my girl getting pinched on St. Patrick's Day, and she didn't have any green in her dresser, so mommy's fabric stash to the rescue! I lengthened the size 5 for my girl and it ended up way too big :( The white fabric has a subtle stripe in it and was really pretty in person. I don't think anyone else had trouble with the sizing, but I am hesitant to use this again (I normally get good results from following whatever measurements are given).


This top and skirt are so cute together, but D never wore them as an outfit except for pictures. I realized, after taking way too many pictures, that my neckband was wonky. I put the top in my mending pile and there it sits, to this day! She wore the skirt a couple times, but it didn't get worn as much because it was a bit of an orphan (ie, she didn't have any tops to go with it). The top is a soft, buttery yellow knit with white stripes and a woven polka dot collar. The skirt is a quilting cotton with colorful mermaids on it. Both patterns are Made for Mermaids: the Samantha suspender skirt and the Charlotte collar top.


The skirt above did make an appearance when we went to see the mermaids at the aquarium! You can't see it in this picture, but it was too cute not to share. These are my sweet nieces (yes, they're twins) that came to visit. I made a mermaid applique for my nieces shirts using fabric and Heat & Bond. Danielle wore her mermaid skirt from  above, and the girls wore some Katie John skirts from Coles Corner and Creations with mermaid fabric accent (I was pretty low on mermaid fabric and decided last minute to make outfits for the aquarium--there was some seriouspiecing going on and I might have stapled a hem that I forgot to sew...). We had a great visit and the mermaids were really cool to see!

Sunday, August 2, 2015

Rainbow Unicorn Party

It's only been a couple months since the kids' birthdays, so I figure this is a good time to share about Danielle's party :)

I sewed Danielle a dress and tried to go with something with oomph, like I usually do for her birthday dresses. I used the Kenzie's Party Dress pattern from EYMM and did not enjoy making this dress! The math didn't work out right, and the dress looks a little limp without a pettiskirt underneath. But, my birthday girl loved it and is was very colorful and girlie.


The skirt is made from 12 flounces, which are sewn together into three tiers. The top tier has smaller flounces and the bottom two are the same size. I made this dress using fabric from my stash (because my stash is that ridiculous), except for the My Little Pony fabric which I bought for this dress.


The back is cut low and buttons, and there's a very large sash that makes a very large bow (shown looking tired because it's after the party!). I used some clear sparkly buttons, because sparkles go with rainbows and unicorns, right?


Speaking of, when Danielle mentioned that was the theme she wanted for her party, all I could think about was some cookies I saw on Pinterest labelled "unicorn poop". I instantly agreed with the theme, all because I wanted to make those cookies! And we did :)


I ended up using a sugar cookie mix (which made it soooo much easier), and the dough was kind of limp and sticky and hard to work with, so I ended up having to do my own thing for the swirls  instead of following the directions I found. I love how they turned out and the kids loved being able to say the word "poop". We also made rainbow cupcakes (we being me and D--she was a lot of help with the cookies especially). That was cake batter split into separate bowls, then colored and put into cupcake liners one at a time.


Some fluffy white "cloud" frosting and silver sprinkles topped those off.  Lest you think I'm one of those moms that goes overboard on my kids' birthdays, I promise, I am not! I try to balance making and buying things, and I try to get the most bang for my buck. I usually buy a character banner (that's $5), and then coordinate with solid color plasticware and plates and balloons from the dollar store. Add in a themed outfit which is way cheaper to make than buy, and we've got a party! Since Danielle picked a theme that wasn't character based, I did do something special for her banner:


A rainbow balloon arch! I learned to make balloon arches back in college for our military balls, so I used those long-ago skills, $4 dollars worth of balloons and 2 hours of my time (plus an hour of my husband's because he blew most of the balloons up with his air compressor in the garage) to make this. It was high impact and very inexpensive!

I think the most fun the kids had was with a "Pin the horn on the unicorn" game that I got for less than $2. Even little brother played:


Lots of fun without breaking the bank, and most importantly, my girl was over the moon.


Friday, June 26, 2015

Every blog needs some Jalie!

I got some patterns in the mail today and my first thought was that I should post them on my blog. I thought that was pretty funny because I've only posted once this year (and, as a followup, I should add I did NOT end up sewing any items for the wardrobe contest--accountability, schmaccountability)

Here are my awesome new patterns:


I used to think Jalie patterns were expensive (they certainly aren't as cheap as the $1-$2 you can pay during paper pattern sales) but they're actually priced less expensively than a number of independent lines, and the quality and size range is pretty amazing. I've yet to sew a Jalie pattern up, but I have a swimsuit cut out for myself (Jalie 3134) that I hope to work on this weekend, and I've read many an awesome review on Pattern Review.

Jalie is known for their knit/activewear patterns and they just released this super cute leotard pattern that I want to get if my girl starts gymnastics in the fall. How cool are those stripes that extend down the arms?

photo from Jalie's website


In the meantime I plan to sew up the two patterns on the left in my picture above. I started working out a couple months ago because I figure I ought to get started on losing my baby weight now that my "baby" is 48 months old (the months is supposed to sound better than years...ha!) I've been doing a Jillian Michaels workout video twice a week before work and running a couple miles outside on Saturday and Sunday. I've always worn baggy t-shirts and shorts for working out, but it's too hot to wear anything but a tank top and I think it would actually be more comfortable to run in something fitted. Plus Jillian has been kicking my booty and I need some clothes that won't shift around while I'm busy dying doing my workout.

photos from Jalie's website

The Cora is a pattern for pants or shorts and has some cool color blocking options. The Anne-Marie can be a top or dress. I don't play tennis, so I'm interested in the fitted version of the tank (not shown above). The coolest thing is that the top has a pocket in the back--I run with my iPhone and I'm hoping that will be a great place to tuck it. The shorts/pants also have an optional pocket in the back.

Between work and family, I've been keeping pretty busy, but I'm hoping that I'll stick with blogging again. I hope I see you again soon!
Related Posts Plugin for WordPress, Blogger...