Monday, October 31, 2011

My Treasure

So the kids are going as pirates for Halloween and I wanted to coordinate, but didn't want to sew myself an entire outfit. Enter the embroidery machine. I came up with an idea to put on a shirt for myself and could have used my awesome Janome 350e's editing capabilities to combine the text and applique I wanted. BUT, it would have been quite a bit of effort, especially as I was going to make shirts for the grandmas as well. So, I finally took the plunge to try the demo for Embird embroidery software.

My first design--I merged text and an applique


I have been holding off on downloading Embird because I want to be able to purchase the program if it turns out to be really awesome. I also didn't want to try to learn to use it during the holidays when I always take on too much to sew. And I wanted a time when I would be able to get the most use in the 30 days allotted. All those reasons went out the window when I needed it for Halloween:)   Here is what the grandma design looks like stitched out (the colors are a little different):

My mother-in-law's shirt
(mine is stitching out as I type this)


The treasure chest is from Planet Applique, and I used 3 fonts from 8 Claws and a Paw (Tempus Sans, Happy Birthday and Harrington).  I really like how the design turned out and was quite pleased with Embird.

I finally got some polymesh stabilizer ordered
and the design lays so smooth!


Friday, October 28, 2011

Samuel's Halloween "costume"

Danielle is going to be a pirate this year (like I mentioned in this post) and Samuel will be dressed to coordinate with her. I made some striped pants for him by tracing some store-bought ones.  Then I appliqued a long-sleeve onesie with a little pirate ship.

Arrrg!


I also appliqued a bib for him that says "I <3 Pirates", where the "a" is a skull.  It was a freebie from the Planet Applique Yahoo group.  I took the kids to a playdate dressed in costume and the bib got spit up on before I took any pictures, oops.  I will snag some on Halloween though.

Closer view of the ship

Tuesday, October 25, 2011

Burp Cloth Gifts

Even though I am no longer selling my burps, they will still be popping up as gifts, at least while I have some supplies left.  These are for my sister to give to her friends (odds are pretty good they haven't been following my blog, so I feel safe posting them).

This Turquoise Flowers set is for a little girl.  I used the font "Bella" and love the "L".

Font from 8 Claws


This is my favorite of the two.  It's the Blue & Grey set.  I love the font in the grey thread.

"Happy Birthday" font, also from 8 claws


I have a few more sets to work around my Halloween and other seasonal sewing--apparently everyone in Tennessee is having babies!

Saturday, October 22, 2011

Ruffled Pants Outfit

I finished up Danielle's ruffle pants that go with her Broom Rides shirt a while ago, but wanted to wait until I had pictures of her wearing them to post.

The outfit


The pants are from Simplicty 2907, which is a pattern for boys and girls.  Because of that, I think these ran long (normally kids patterns from the big 4 run short and wide).  I took 4 inches off the bottom and only added 1.5 inches or so back with the ruffle.  And I took an inch off of the top (where the folded-over casing would be) in order to add a purple waistband that was an inch tall.  I should have taken at least another inch off the top though.  These are definitely high-waisted on her as is, which might be in for adults, but doesn't work on my slim girl--they just slide down over her non-existent hips. (Problem solved, for now, by folding the waistband down).

Love the pocket and faux fly details


Besides adding the purple details, I left the horizontal leg seams off and slimmed the legs a bit (they are still pretty full).  I'd say this pattern was drafted more for boys (though they show a version with hearts)--so this will be great when Samuel gets a little bigger.

I love the pockets especially, and will use them again, maybe on some pants that need less tweaking.  Anyways, here's the result on Danielle.  Have I mentioned how hard it is to get good pictures of her?

This is the best picture of the outfit I got, out
of about 2 dozen shots.  Seriously.

Layered because it was chilly!


We went to a MOPS playdate at the corn maze and they had this cool "cornbox" to play in.  I think that was Danielle's favorite part.

Note to self: get a sandbox next summer


I made some spiderweb barrettes to go with the shirt.  They also coordinate with the first Halloween shirt I made her.

Barrette design from GG Designs


These would look really cute as bow centers,
if I ever decide to get into bow making...

Samuel's pirate ship onesie is done, so I will be sharing his Halloween costume next (I think:)

Monday, October 17, 2011

Halloween Preview

So I have two weeks to get the kids' Halloween costumes ready (less if they are to go to other events and playdates wearing them).  I need to get busy!

This year they are going to be pirates (though Samuel will just have an appliqued onesie and bib to go with some striped pants).  Danielle had a choice between Tinkerbell and pirate and I was very happy with her pick because I have all the fabric I need in my stash!  Plus, it will complete my quad-fecta (I know that's not a word) of this pattern:

Best dollar I ever spent!

I made the cowgirl outfit last year for Danielle's Halloween costume and then made two sets of scrubs and chef outfits for my nieces' Christmas gifts (for them to use to play dress-up).  The chef hat is particularly awesome, as it has velcro and is adjustable.  The shirts all fasten up the back with Velcro--no buttons to mess with.  I think the details of these patterns are great and it's worth the money, even if you don't catch it on sale for a dollar.

Trifecta

I hope this year's costumes go over as well as last year's.

Yee-haw!


Friday, October 14, 2011

Closing Up Shop

I have such a heavy heart today.  I will be closing up shop, effective immediately :(  I still plan to sew for fun and for my family, but I will not be doing it as a business anymore.  It has become a distraction from my "real" job, which is to be a full-time mommy. 

I apologize for any inconvenience this may cause, but I am grateful to know I have wonderful friends and family supporting my decisions.  I will still be blogging, as I can, and hope you will continue that journey with me.

Love,
Angie

Tuesday, October 11, 2011

Twin Owls

I appliqued some shirts for my nieces at my sister's request.  She is really into owls right now and wanted me to put this design from Lynnie Pinnie onto some shirts for the girls.

Whoo's got the best nieces?  I do :)


Doing two of the same shirt was nice--the first one was exciting because it was all new, and then the second one was peaceful since I knew what to expect.

The shirts are actually purple like in this detail shot

I have some shirts planned for later this year that will be the same for my nieces and my daughter, so I hope that making 3 that are the same will be just as enjoyable.

No-sew Weekend

Okay, I did a little sewing, because I have a slight problem.  But, I didn't finish anything, so that counts, right?  Instead, I spent some time chasing running around with 3 awesome little girls.

I visited my sister and it was the first time we've had the girls--her twins and my daughter--together in a year.  They had a blast.  We dressed them alike and took them to the pumpkin patch, where they got mistaken for triplets a few times because they're close in size.

I made candy corn snap clips for the girls and forgot to take pictures for this post because I was having too much fun.  I did get some action shots though :)

Barrettes in a corn maze

Barrettes on a cow ride

Barrettes acting shy


Here's a closeup of the barrettes on a 2 year old head (they fit nicely on grown-ups too!)
Cute clips from GG Designs


I LOVE this time of year--it's my favorite to sew for and when it gets colder I will be hibernating in my craft room.  I hope y'all had a great weekend and got to enjoy some fall weather!

Thursday, October 6, 2011

Halloween Shirt II

I couldn't resist making one more Halloween shirt for my daughter after seeing this design at Planet Applique.

Isn't it adorable?


I am almost finished making her a pair of pants to go with it--a pair of jeans with a purple waistband and ruffle at the bottom and some subtle purple top-stitching.  She'll be able to wear the pants longer than the shirt, especially since purple is a common color in my little girl's wardrobe.

Detail shot


Next up--twin shirts!

Tuesday, October 4, 2011

Tutorial: Toddler Grocery List

There are lots of moms who are trying to juggle sewing time with the time it takes to do chores. Hopefully this tutorial will help with the latter. It will walk you through creating a list that will keep your child busy engaged at the grocery store. I've also provided a link to a pre-made list that is 6 pages long.

Sheet protector + Dry erase marker = Reusable!

I saw a similar idea online a while ago and when I couldn't find it before our grocery run this morning, so I made my own.  It's a list of words and pictures for my daughter to help me find items in the store.  I used a mix of items she was familiar with and some that were a bit of a challenge for her. 

After creating a list in Microsoft Word (I made two pages for today's trip), I printed it off and put it in a plastic page protector.  My daughter crossed off each item off with a dry-erase marker as we found it in the store.  She loved it! 
I'm hoping the combination of pictures and words
will help when she's ready to start reading


I've created a list of almost 50 items, including fruits, veggies, dairy, meats and starches.  You can download it (it's 6 pages long) off of Google docs here: Toddler Shopping List.

If you download it as a Word document, you can edit it to delete or replace the items that don't suit your needs.  Or you can read on for details on creating your own list from scratch.


Hopefully you will find these instructions to be useful, even if you're fairly computer savvy or are using a different version of Word (I have Office 2003).  I do assume that you have some knowledge of computers (ie, how to "Google"), so please email me if you have any questions.  Of course, there are multiple ways to do things within Word, this is just the way I prefer.


1.  Create your outline in Word
Open a new document in Word.
Change the layout to landscape.  Select "File" from the Menu bar, then select "Page Setup" and click "Landscape".


Create two columns. Select "Format" from the menu bar, select "Columns" and then click on "Two".


Change the font and font size to something easy to read (even if your toddler can't read yet, you want the letters to be clear and distinguishable).  I used "Courier New", 18 point, bold.  Type in the basic name of the foods you want (ie "bread" or "eggs"), separating each word by several returns so that there will be room for pictures.  I used 5 spaces in between each word. 


Four words fit in each column for me.  To add words in the second column, place your cursor at the end of the last word in the first column, select "Insert" from the menu bar, then click on "Break".  Then select "Column Break" from the window that comes up.


Type another column of items.  Now your list should look something like this:


**I took all the following screenshots with only one column showing, I apologize if that causes any confusion**


2.  Find and save the images you want
A quick way to do this:
  1. Enter the name of a grocery item in a Google search box
  2. Select images from the list on the right to see results as pictures
  3. Hover your mouse over the picture you want to save.  It will expand and you can right-click and select "Save Image As" to save to your computer.  Save the images to your desktop for now
  4. Repeat for the other items on your list


3.  Add your images to your shopping list
Resize the window with your Word document so that you can see both your list and the icons of the images saved on your desktop.

Drag the icon of your first image over to the Word document (you'll want to clicking and holding the left mouse button on the icon in order to be able to move it).  Release the mouse button and the image will be inserted into your Word document.


Here's what my image looks like now that I've dropped it into Word.


We'll make a few changes so we can reposition the image and it will fit with the text we've laid out.

First, select the image, right-click on it, and select "Format Picture"


Select the 3rd tab "Layout" and click on "Tight".  This will allow us to move the picture wherever we want.


While we have the Format box open, we'll set the size as well.  I like to do it this way so that the images are all about the same size.* 
Select the "Size" tab and enter a height--I chose 1.2 inches to fit 4 pictures vertically on a page. 


* You could also just go the traditional route and resize the picture by using your mouse to drag the handles around the image (make sure to hold "Shift" while you do that so you don't distort the image).


This is what my broccoli looks like, now that I've changed the text wrap and size properties.


Drag the picture to the left of the word it belongs to. The text wrap on the picture will scootch the word over.


Add the remaining pictures the same way.

Here's what an entire page looks like.  Yes, we do buy a lot of veggies :)


If you end up trying this, I'd love to hear if you found it useful and how your shopping trip with your little ones works out!


Saturday, October 1, 2011

Baby Wipes and Sunshine

I've been making some quick projects for the kids lately:

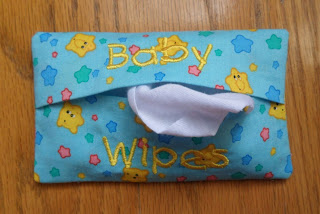
Danielle got some wipes for her babydoll.  Hopefully this means she'll stop stealing real ones.

These go great with the diapers I made for her doll
(more on those later)


The wipes case is a free download from DigiStitches.  I used some Care Bear fabric leftover from pjs I made my her last year.  The wipes are just rectangles of white knit I cut so that they'd be just a little smaller than the case (old t-shirts are perfect for this).  Now if I can just get her to stop trying to throw these cloth wipes away after they get "dirty" during her babydoll diaper changes...


Samuel got a toy too--this cute little Sammy Sunshine design I picked up on sale before he was born.  I spent forever trying to pick out ribbons because I just couldn't visualize the combination (plus I wanted a variety of textures and sizes).  Of course, once I figured it out, i forgot to straighten them out for the photo...

Makes Sammy look a little gimpy, huh?


Samuel loves his new chew toy--he's at that puppy baby stage where he likes to gnaw on anything he can.

Nom nom nom


He had a great time with it and covered it with lots of drool. I'm going to pick up a plastic clip for it the next time I go to the store, so that I can clip it to his car seat or stroller.

This design was definitely a winner!

Related Posts Plugin for WordPress, Blogger...