Showing posts with label dress. Show all posts

Sunday, July 31, 2016

I'm Such a Trendsetter!

It's going to seem like I'm jumping on the Pokemon Go bandwagon, but all the hubbub about the game has just reminded me that I never posted my makes from Danielle's Pokemon themed birthday party. Her birthday was in April, so I'm going to go ahead and take credit for making Pokemon huge again, k?


Danielle is getting older (she's 7 now!) and she didn't want "poofy" sleeves. She still likes some ruffles and adores a good twirl, but her birthday dress this year was a bit tamer than previous years (see birthday #4 and birthday #5). I made the Candy CastlePrincess dress pattern with 3/4 sleeves. I used two different Pokemon prints and Danielle *perfectly* accessorized it with a Torchic inspired necklace (one of the activities we did at her party). She also did her own hair, and I think it looked cute :) (We did pictures after the party so it's a bit messy, don't judge)

This is Torchic (Pokemon wikia)

The dress was an easy make and fit well. I bought a Babylock ruffler for my machine (I've had bad luck with the two generic rufflers I bought when I used a Janome), and it got a little fussy with me. I don't remember exactly what happened, but I had a very long strip of ruffle and had to go back and re-gather a few bits. Oh, and I had to squeeze the ruffle out of the piece of white with black polka dot fabric I had, so I may have cheated and gathered it a bit more and a bit less in some places. Besides that mess, everything went together really easily.


Little brother got a custom shirt in the party theme. I used the Mac's Monster Tee pattern from Cole's Corner and Creations and I LOVE how it turned out!

The non-Pokemon parts are plain black cotton lycra


I've seen raglan shirts made for boys with a mix of woven and knits (the front of the shirt is made from woven and the rest from knit), but I didn't want a solid shirt panel. Plus I wanted to find a way to use both Pokemon prints. I made the shirt according to the pattern--the only changes I made were to use a woven fabric for the lower front panel, and to add a woven pocket (piece from another pattern). I don't sew for my boy enough and he was very happy with his new shirt.


Beside the clothes, I also "made" a cake (some poorly frosted cupcakes shaped like a Pokeball) and we played a few games. Girls seem to like activities more at their parties than boys do. It was a fun day and I loved seeing both my kids in mama-made.

My favorite birthday picture is always the "cake face" one :)

Sunday, August 2, 2015

Rainbow Unicorn Party

It's only been a couple months since the kids' birthdays, so I figure this is a good time to share about Danielle's party :)

I sewed Danielle a dress and tried to go with something with oomph, like I usually do for her birthday dresses. I used the Kenzie's Party Dress pattern from EYMM and did not enjoy making this dress! The math didn't work out right, and the dress looks a little limp without a pettiskirt underneath. But, my birthday girl loved it and is was very colorful and girlie.


The skirt is made from 12 flounces, which are sewn together into three tiers. The top tier has smaller flounces and the bottom two are the same size. I made this dress using fabric from my stash (because my stash is that ridiculous), except for the My Little Pony fabric which I bought for this dress.


The back is cut low and buttons, and there's a very large sash that makes a very large bow (shown looking tired because it's after the party!). I used some clear sparkly buttons, because sparkles go with rainbows and unicorns, right?


Speaking of, when Danielle mentioned that was the theme she wanted for her party, all I could think about was some cookies I saw on Pinterest labelled "unicorn poop". I instantly agreed with the theme, all because I wanted to make those cookies! And we did :)


I ended up using a sugar cookie mix (which made it soooo much easier), and the dough was kind of limp and sticky and hard to work with, so I ended up having to do my own thing for the swirls  instead of following the directions I found. I love how they turned out and the kids loved being able to say the word "poop". We also made rainbow cupcakes (we being me and D--she was a lot of help with the cookies especially). That was cake batter split into separate bowls, then colored and put into cupcake liners one at a time.


Some fluffy white "cloud" frosting and silver sprinkles topped those off.  Lest you think I'm one of those moms that goes overboard on my kids' birthdays, I promise, I am not! I try to balance making and buying things, and I try to get the most bang for my buck. I usually buy a character banner (that's $5), and then coordinate with solid color plasticware and plates and balloons from the dollar store. Add in a themed outfit which is way cheaper to make than buy, and we've got a party! Since Danielle picked a theme that wasn't character based, I did do something special for her banner:


A rainbow balloon arch! I learned to make balloon arches back in college for our military balls, so I used those long-ago skills, $4 dollars worth of balloons and 2 hours of my time (plus an hour of my husband's because he blew most of the balloons up with his air compressor in the garage) to make this. It was high impact and very inexpensive!

I think the most fun the kids had was with a "Pin the horn on the unicorn" game that I got for less than $2. Even little brother played:


Lots of fun without breaking the bank, and most importantly, my girl was over the moon.


Wednesday, September 17, 2014

Fill Me Up, Buttercup

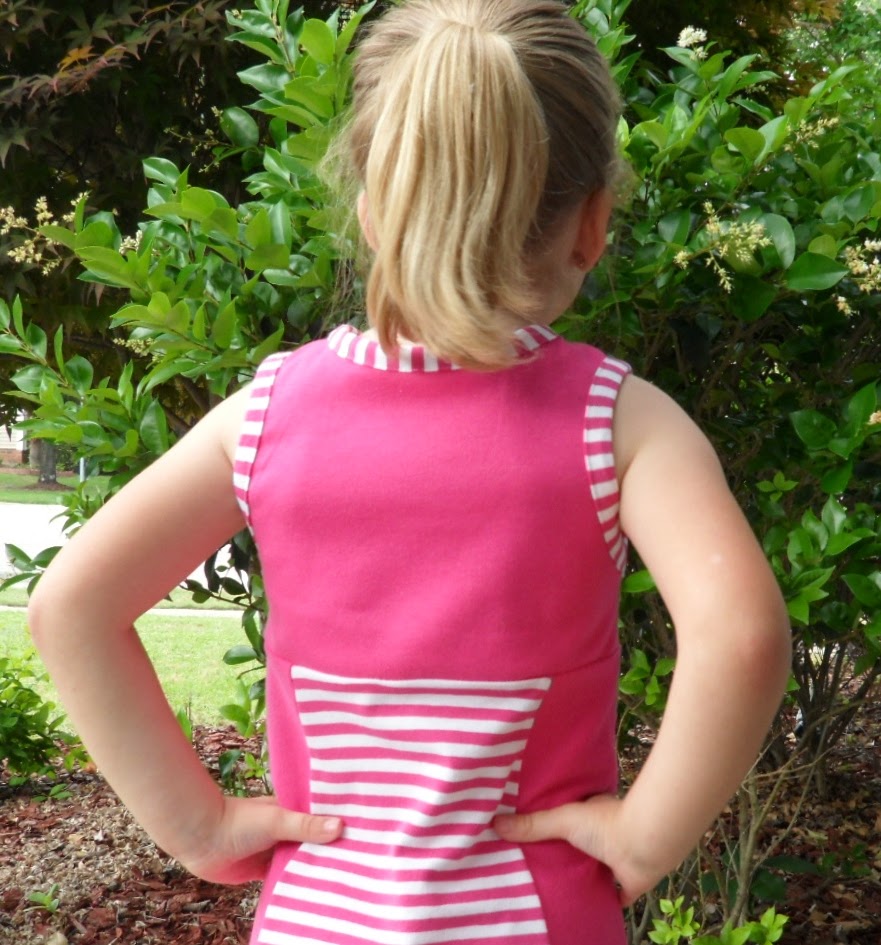
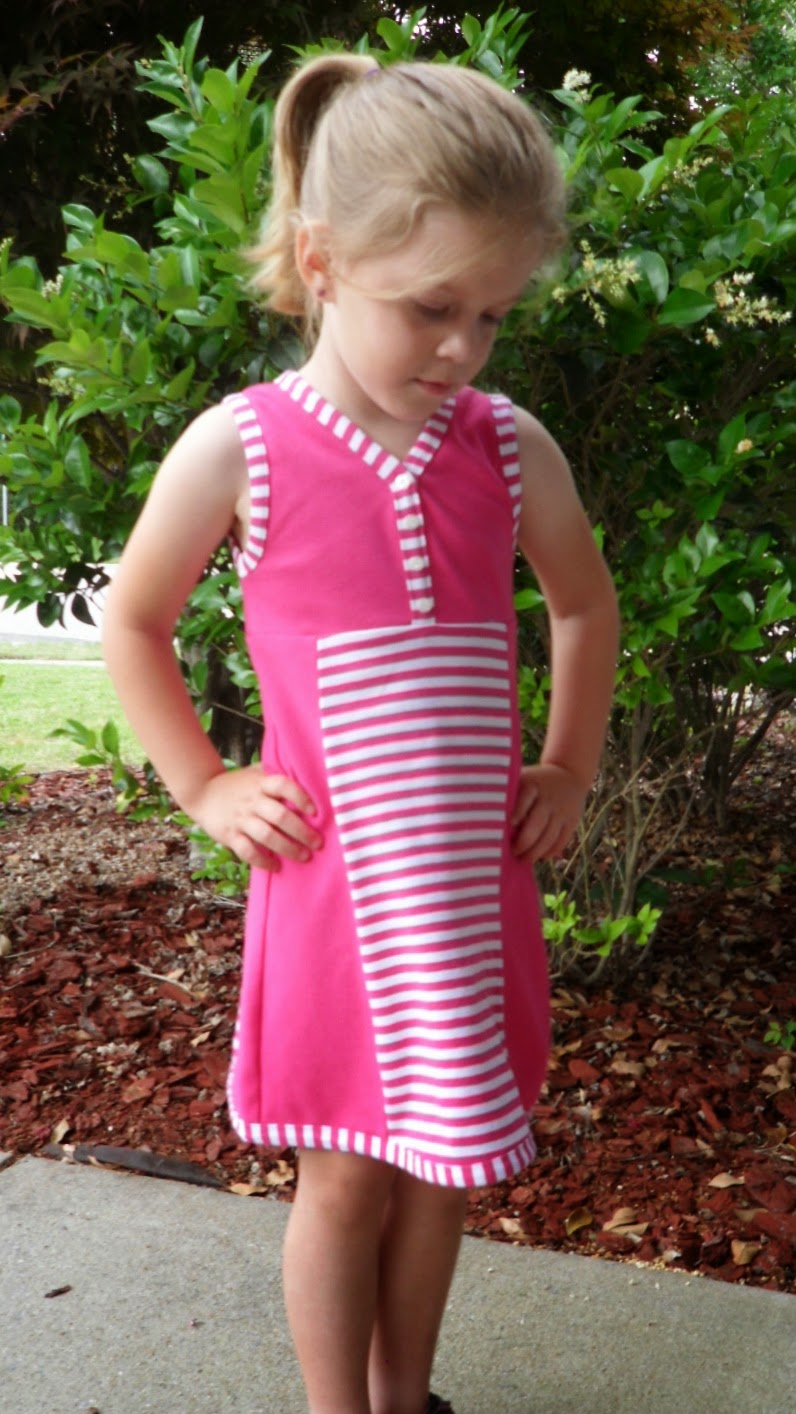
I've been sewing a lot with knits this year. I made myself a dress earlier this year, and I've been sewing a lot for the kids. Today's share is a knit dress I made for Danielle earlier this summer. It's not the usual silhouette she wears--it's A-line and not twirly, but she loves it and insisted on wearing it after the photos.


This is the Buttercup Dress from Cole's Creations. This was actually the first pattern Nicole collaborated on with her mom. Cole and her sisters learned to sew from their mom, and all 3 girls are pattern designers, so I think it's safe to say that this was a natural fit :) Since coming out with the Buttercup, they've put out another half-dozen or so patterns!


The dress has two bodice options--bias down the center front, or just around the neckline. The bias binding is knit, and the directions for how to attach it make it really easy to do. There are lots of options for embellishing this dress and I decided to add the same bias strip around the hem to add some interest. My knits are both from Chez Ami and they were awesome to work with. They're pretty beefy and just feel like quality, if that makes sense:) Though I used "plain" knits, this dress would be super cute with an up-cycled knit as the center front panel. The panel design, and how narrow they are, make them a perfect fit for up-cycling (or for using super pricey knits).


There's still plenty of warm weather here in the South, so we'll get a few more wears out of this dress this year. I've switched my sewing to fall/colder-weather items, but I have a bunch of summer stuff to post on still. Maybe someone in Australia reads my blog and will appreciate it? :)

Just because this makes me laugh :)

Saturday, May 10, 2014

Happy Hello Kitty Birthday

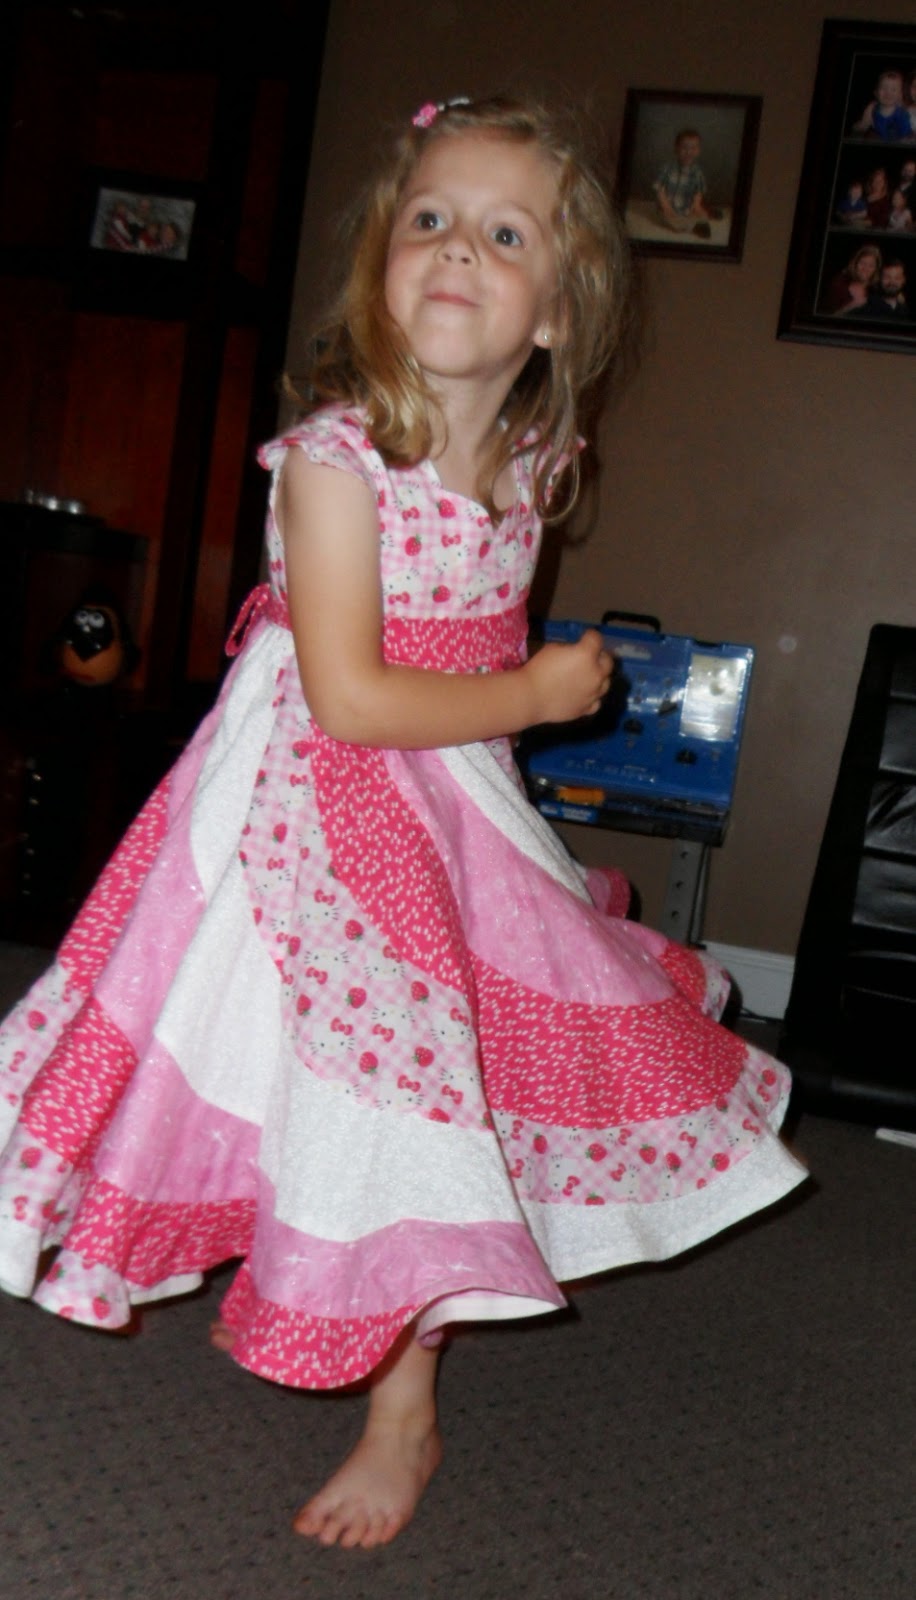
My sweet girl turned 5 recently and I wanted to make her a special dress. For her birthday, I like to do something a bit "more"--more ruffly like last year's dress, or more twirly and more pink like this year's. :)

I chose the Peppermint Swirl dress from Candy Castle patterns, so I had Danielle pick the Hello Kitty fabric she wanted for the main print. She chose a sweet pink gingham Hello Kitty fabric and I used a sparkly pink to coordinate. I also used a tone-on-tone white and a hot pink fabric with white spots on it (that reminded me of the strawberries) to round out the flounces.


I didn't get the best pictures--I was sick that week and was rushing to get the dress done on top of the party preparations. That's okay though, birthdays are more important than blog pictures :)

I used a size 4 slim bodice with a size 5 length. It's slightly empire, with a sash between the bodice and the skirt. And oh that skirt! There are 16 flounces, each made of two pieces. I got excited to make her a dress with a 9 foot hem, thinking it would be super twirly. In the middle of hemming it, I wondered why it was taking so long...then I realized I had read the bias requirements too quickly--I used 9 YARDS, which meant the hem was 27 feet around!!


It makes for one very twirly dress! She loved it and it was over-the-top enough for a birthday :) The fit was good but the dress was a little longer than I expected. It hit an inch or two below her knees. That's probably a good thing though--when she gets to spinning, the dress lifts up quite a bit!


She loved her dress and so did a lot of the moms at the party. One of them said she was going to talk to me about a dress for her daughter's birthday. I think she will be scared off when I tell her what I would charge for a dress that takes 4+ hours to make and uses several yards of fabric! It was totally worth it to see my daughter shine on her special day though (cue cheesy/creepy photo effects):


And just because, here's one more picture of that pretty skirt:


Sunday, April 6, 2014

Winter Street Dress Blog Tour

If you've popped over here for the blog tour, hello! I usually sew for my kids, but I have made it a goal to sew for myself some this year. So when Deepika was looking for ladies to test a dress, I thought it would be the perfect motivation for me. This is the Winter Street Dress, designed by Deepika, the found of PatternReview.com and drafted by Maria Denmark.

I actually made two versions. My first try was in a ponte knit, and while it's an appropriate fabric for the dress (see Detective Houndstooth's gorgeous version using ponte), it didn't work for my figure. The structure of a stable knit highlighted my curves in a very unflattering way.

I wrote Deepika, feeling very discouraged and thinking this silhouette just would not work for me. She suggested that maybe it would work in a drapier knit. There are inverted pleats that offer a little tummy camouflage if needed, without extra fullness if you're slim. The skirt has a tulip shape and the pattern is drafted for a C cup and an above the knee hem. So, in theory, it should have worked for me. She didn't pressure me to re-do it, but I decided to try again and I am so glad I did!!


The neckline--the part that I need the most practice with when sewing with knits--has a wonderful method of construction which leads to a nice-looking, no gape neckband. Deepika includes a link to a video showing the method, or you can also read about it in her tip on Pattern Review: Narrow Binding on necklines and armholes for knits


I did make some slight fit tweaks. The dress actually turned out pretty good in the size made by using the measurement chart (L top, blended to an XL waist, with an XL skirt), but since my first attempt was so horrible I thought I should use it as a muslin and learn a bit about fit in the process. I have an ample bum, so I increased the width of the back skirt by 3/4" (on the fold) in order to make deeper pleats in the back. In the ponte they looked like they were straining, but the increased depth of the pleat and the drapier knit make them behave much nicer.


I also made a swayback adjustment, though I imagine the bunching I get at often get in the small of my back is due to my bum curve and not necessarily a sway back. Deepika sent me this swayback alteration for knits to check out. I traced the size I needed for the back and then marked a dot 1/2" up from the bottom on the center fold line. I used a ruler and drew a line from that dot over to the bottom corner of the outer edge. I did something similar for the skirt, removing a wedge that was a 1/2" deep in the center back, tapered to nothing on the outer edge. The result was great! I have some store bought knit dresses I like to wear with a belt, but they always bunch up--you can see this doesn't. The only issue I had was that I used the same pattern piece to cut out the front skirt and accidentally made a sway-front adjustment, oops!


So I have to wear the belt with this version, but the dress looks super cute without it--check out Sew Crafty Chemist's version.

A few other adjustments I made--I added 1/2" (on the fold) to the back bodice as a cheater broad back adjustment. I don't know if I actually needed this. Trumbelina's post on her dress has great details and illustrations on how to do one properly and is another super-cute, non-belted version.  I also added 1/2" width to both sides of the sleeves, as my arms often feel like sausages in RTW clothes. I probably didn't need that extra room but it's so nice not to have snug sleeves! I took a smidge off the sleeve cap to account for the extra length of the armscye from my width adjustment--the sleeve should fit in the armscye without gathers.


I also made 3/4 length sleeves by adding some length to the cut line for the flounce. We're entering spring here in the South but our office is air-conditioned, so these will be perfect. 

I did not change the hem length and found in my first version that I would not need to change the hem length of the long-sleeves either. I did not change the bodice length either. I'm only 5' 2", so keep that in mind if you are not so short! It looks high in the front in the next picture, but it hangs straight in real life.


I do not love the side view quite so much, but that is not the fault of the pattern--this is actually the most flattering dress I've worn since having kids! My mummy-tummy combined with a once-petite, now-full hourglass shape can be difficult to dress in one-piece garments. I thought that I could only wear dresses that were super full on the bottom or were empire-waisted. This dress has a seam at the natural waist and the fullness is due to the inverted pleats, proving me wrong. I already plan to make another version of this dress!

Thank you, Deepika, for your help and encouragement in making this dress. And thank you for understanding that women want to feel nice in their clothes, even if they are not in perfect shape :)

Be sure to catch all the version of this great dress on the blog tour. Here's the whole schedule:

Sew Crafty Chemist 4/2/2014
Detective Houndstooth 4/3/2014
How Good Is That? 4/4/2014
Trumbelina Sews 4/5/2014
danikate Designs  4/6/2014
Sherril's Sewing Saga 4/7/2014
Sharon Sews 4/8/2014
Stitchin' in My Kitchen 4/9/2014
sewing forward 4/10/2014
Hellou's Handmades 4/11/2014
Crafted By Carrie 4/12/2014
Greetings from Beyond the Basic Block 4/13/2014
JanMade 4/14/2014
Julia Bobbin 4/15/2014

**A note--My dress seems to be fuller in the front and fit differently from some of the other versions (and the line drawing). I did select the XL waist and XL skirt sizes based on my measurements and using the chart in the pattern. The tutorial has you use clear elastic at the waist seam to stabilize it. I don't believe I stretched the knit to make it look gathered, though that is possible. Rather, I think it's just the way my weight is distributed and the way the knit hangs. I assembled the back skirt the same as the front and you can see that looks a lot smoother. Regardless of the reason, I'm glad for the way the dress hangs in the front on me!

Saturday, April 5, 2014

Ready for Warmer Weather!

I'm not going to lie--I felt like a total superstar when Laura from Ellie Inspired asked if I wanted to be in her tester group for her spring pattern line. It was a no-brainer--I said "yes"! Sleep, schmeep. Who needs sleep when there are cute spring dresses to make?

Garden Party Dress pattern by Ellie Inspired


See?! (Okay, pattern testing might be a problem, but it's not as big as my fabric buying issue so I'm going to overlook it for now...) This is the Garden Party dress that was just released last week. I made a bit of a boo-boo working on it late at night, but a sash saved the day and the pattern now includes a sash option :)

The photo on the left shows how I traced the wrong size for the BACK bodice piece.
The photo on the right is where I tried to cut the extra off the FRONT bodice. Doh!


When my bodice side seams didn't line up, I realized that I had traced the wrong width/length for the back bodice piece. Easy enough fix--I could just trim the extra bit off since those sides weren't sewn yet. Except that whole sewing at night thing meant that I cut the extra off the front bodice. Oops. I seamed some fabric to the front and then carefully cut the extra off the back, finishing the dress with no further mishaps.

The boo boo seam is on the bottom left of the bodice


The seam isn't super visible, but I think it definitely needs the sash to hide it. I love the Minnie Ta Dot fabric I used for the bodice, so the sash just gave me more to love :) I really do love this fabric combination, especially with the contrast band on the skirt. Speaking of the skirt, those pleats took quite a bit of time. But they are so sweet!


I really love how this dress turned out. It fit well and it's so modest and pretty. And those cap sleeves are awesome. I don't know if I've ever made cap sleeves before, but it was really neat how the lining and construction was done. I made this dress last weekend and ever since the weather has been really beautiful here (70 to 80 degrees). Coincidence? I think not... 

Friday, February 7, 2014

The Pretty Paris Dress

So I said no more princess dresses (for right now), and I mean that, but I need to be honest. This next dress is actually from a princess pattern. I just didn't have the right colors for a Tiana dress in my stash, and I wanted to see what the pattern would look like in "normal" fabrics.


I am absolutely in love with this pattern (it's the Tiana Dress pattern from Made for Mermaids). It's a peasant style dress but the bodice is shaped, like a good peasant dress pattern should be (that means the front and back have different necklines and aren't just blocky). It has a sash which means a better fit for my slim girl. And the skirt, oh the skirt!


These pictures don't do it justice. There is an underskirt that hangs just the right amount below the overskirt. The overskirt is split in the front and back and the curve at the side seams is PERFECT. It is just such a pretty shape and is drafted to meet up so nicely. I love the way this dress is suited for using coordinating prints. (Oh, and it looks so beautiful as a Tiana dress that I went out right after making this to pick up the fabrics for another princess dress!)


I just think this is such a sweet, modest, pretty dress. It's simple enough to make (it is a peasant style), but it has some interesting details and it's just so pretty!! I need to go back and try some of my other "princess" patterns with non-princess fabrics now, to see how they turn out!

Tuesday, February 4, 2014

The Cold Never Bothered Me Anyways

If you haven't seen "Frozen", you definitely should watch it when it comes out on DVD. It was just beautiful, and the music was incredible (especially with Idina Menzel as the voice of Elsa, the Snow Queen). There is an amazing song in the movie where Elsa is building her ice castle, you can see a clip from the movie with the song here:


Isn't it incredible? I can see why Elsa was the standout of the movie for my daughter. Needless to say, I was so happy that Megan from Made for Mermaids got her Elsa pattern out so quickly (following her Anna pattern which I shared in the last post).


I used a sheer white fabric with silver snowflakes on it for the top bodice portion and the overlay and sleeves. Danielle thought it was itchy :( I finished the edges with my serger, so I think she was just being funny about the dress for some reason, but it went home with a dear little friend whose white blonde hair was perfect for Elsa!


The dress zippers in the back and has a two piece bodice, with a half-circle skirt and an optional overlay. The overlay panels are attached where the two bodice pieces meet, and to each other at the sides, but they are split in the front and back which makes for a nice motion.


Goofiness aside, my daughter LOVED this dress (I know, I say that about every dress, but seriously, Elsa is the big hit this winter). I picked up some pretty fabric to make another version for her and I will use a solid woven for the top bodice so that we won't have any comfort issues. This version was actually made using fabrics from my stash (including a turquoise sheer that is hard to see in the photos--it's on the bottom bodice pieces).


I was going to make myself the snow queen costume using Simplicity 5363 (it's the one on the bottom right) and even bought the fabric. But that was about 5 or 6 Halloweens ago and I think this dress was a much better use for the fabric. Plus, there is plenty of both the snowflake and turquoise sheers left to make a few more Elsas ;)


Related Posts Plugin for WordPress, Blogger...