Showing posts with label embroidery. Show all posts

Sunday, February 21, 2016

A Lot of Catch Up

There has been a lot of sewing that I haven't gotten around to blogging in the past couple years. I intend to try to blog in detail about some, but wanted to share some of the others briefly.


This was an outfit that I made my daugther for the 4th of July in...2014 (don't judge). I used denim for the shorts and lengthened them about 4 inches. They're super cute, just designed to be a little shorter than I prefer. They're the Lucy shorts from Made from Mermaids and I love how simple, yet cute, they are. The shirt was RTW and I embroidered it with the Star Spangled Cutie design from Planet Applique.


This pretty maxi dress is the Lily Lace dress and romper from Made for Mermaids. I think the back is beautiful, but we don't really do open backs, so this went to a sweet little friend of ours. She's the same size as Danielle so her younger sister usually gets our handmade-me-downs. She was so excited to receive it :)


Here's my goofy girl with my goofy dad :) This is a pajama top I made by using the Miss Mary Mack Tunic pattern from Love Notions. The ice cream fabric was from Hancock Fabrics "spot the bolt" table. It did not feel nice at all before I washed it, but it was so soft and comfortable afterwards. And it was a steal for less than $2/yard! It'll make it's appearance again in summer PJs.


This is the free Izzy top pattern from Climbing the Willow. I didn't want my girl getting pinched on St. Patrick's Day, and she didn't have any green in her dresser, so mommy's fabric stash to the rescue! I lengthened the size 5 for my girl and it ended up way too big :( The white fabric has a subtle stripe in it and was really pretty in person. I don't think anyone else had trouble with the sizing, but I am hesitant to use this again (I normally get good results from following whatever measurements are given).


This top and skirt are so cute together, but D never wore them as an outfit except for pictures. I realized, after taking way too many pictures, that my neckband was wonky. I put the top in my mending pile and there it sits, to this day! She wore the skirt a couple times, but it didn't get worn as much because it was a bit of an orphan (ie, she didn't have any tops to go with it). The top is a soft, buttery yellow knit with white stripes and a woven polka dot collar. The skirt is a quilting cotton with colorful mermaids on it. Both patterns are Made for Mermaids: the Samantha suspender skirt and the Charlotte collar top.


The skirt above did make an appearance when we went to see the mermaids at the aquarium! You can't see it in this picture, but it was too cute not to share. These are my sweet nieces (yes, they're twins) that came to visit. I made a mermaid applique for my nieces shirts using fabric and Heat & Bond. Danielle wore her mermaid skirt from  above, and the girls wore some Katie John skirts from Coles Corner and Creations with mermaid fabric accent (I was pretty low on mermaid fabric and decided last minute to make outfits for the aquarium--there was some seriouspiecing going on and I might have stapled a hem that I forgot to sew...). We had a great visit and the mermaids were really cool to see!

Saturday, August 23, 2014

3 months and Kindergarten!

Wow, I cannot believe it's been over 3 months since I posted! It's not for lack of content--I have been sewing every week. It's just gotten busy busy around here. One reason is that my girl started Kindergarten!

I was flip-flopping on whether I should make her an outfit and finally decided the night before that I wanted to. I guess I work better with short deadlines.

My big girl on her first day of Kindergarten!

I embroidered a white tee shirt for her and made a skirt to coordinate. The skirt was part of the Addison dress pattern by ModKid. It was the first time I've used one of her patterns and I am in love. The pattern was so nice and and I love the design/presentation of the pattern.  I purchased a few ModKid patterns (I've long admired the Kyoko) and am looking forward to making one up in it's entirety.


The embroidery design is from Hang to Dry Applique. I bought it a couple years ago with the thought that I would use it when Danielle started school. I used some glitter fabric from Hobby Lobby (I found it by the felt) and I can NOT get enough of the sparkle!

Look how shiny it is!!

I struggled to figure out what to pair with the pink and green because I'm not that bold with color and I hadn't realized at first that the "I" was applique and needed fabric too. Then I opened a drawer to get a new bobbin and my eye was caught by glitter sheets and I knew what to do:) 4 out of 4 of my last embroidery projects have involved glitter fabric and/or metallic thread--I think I'm addicted!


The skirt is a basic, two-layer skirt with tabs to pull up the front overskirt. I altered the construction slightly. Instead of gathering the over and underskirt and attaching them to a bodice, I sewed the tops together with the right side of the overskirt facing the wrong side of the underskirt. Then I flipped them right sides out and sewed a casing by stitching through both layers 3/4" from the top and leaving a space open to insert the elastic. The elastic was inserted into the casing between the two layers of the skirt and then the casing was sewn close. Easy peasy! The tabs have the buttons sewn right on them, so no buttonholes, perfect for a late-night project! Though I do love making buttonholes. :)


Saturday, February 9, 2013

Catching Up

Part of what motivates me to get a project done is being able to share pictures of what I've made.  But blogging takes so long sometimes.  So I've decided to do a compilation post of a few items I've completed that don't need their own post.


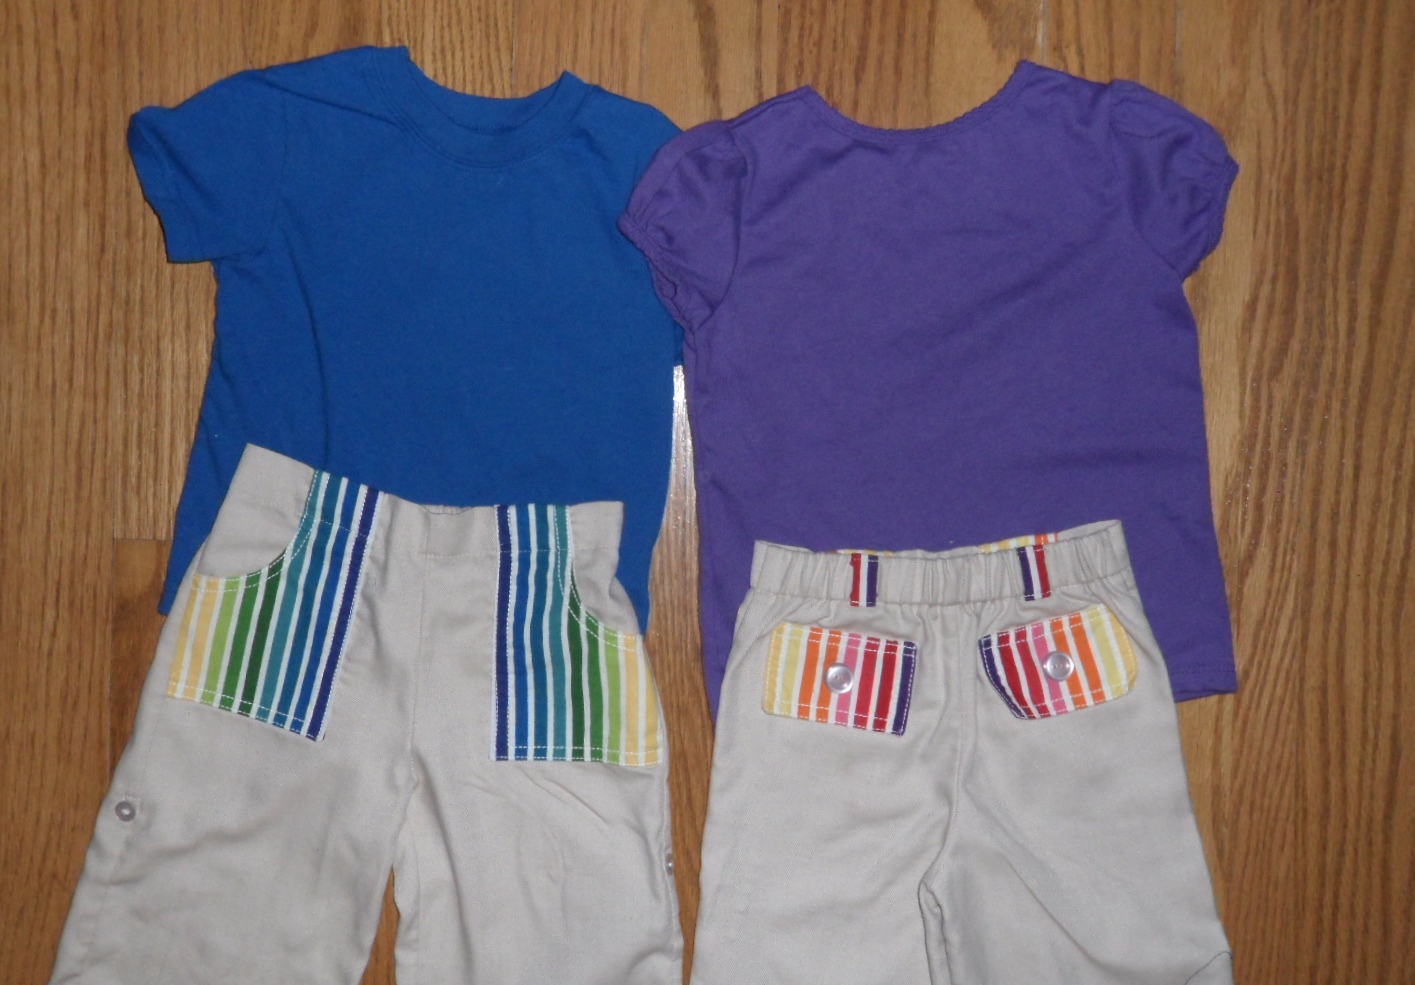
The front of the pants is shown on the left, the back on the right

These pants were my first excursion into pattern testing.  I made them with the PeekABoo Pattern Shop Pier 49 Convertible Pants pattern.  The details are cute, but the basic pants shape wasn't a great fit for either of my kids.  The rise was off and Samuel's diaper was hanging out completely, so the kids never really wore these.  Too bad I spent forever cutting out the striped fabric for the pockets, belt loops, and tabs on the legs...  Both the boy colors and girl colors are cut from the same rainbow striped fabric.


This dress was super cute on Danielle, but she grew out of it before I took modeled pictures, or made these cute kitty cat barrettes from GG Designs to match.  It's the same pattern--Emma's Dress from LilyBirdStudios--that I used to make these cupcake dresses for my nieces from.


This is actually a picture of some sewing my daughter did.  My husband thought I was crazy to let a 3 year old use a needle, but it was a tapestry needle (with a blunted end) and she did a great job stringing popcorn for our Christmas tree!


This is the Tuscany font from 8Claws

And finally, after 2+ years of owning an embroidery machine, I finally monogrammed some of our towels.  This is one of a pair of "R"s monogrammed on the towels that hang in our downstairs/guest bath.  I LOVE this font, and bought it specifically for this project.  Wouldn't you know, I had several hundred fonts from 8 Claws and a Paw already, but needed this one :)

Sunday, November 25, 2012

Organizing Embroidery Files - Part 1

Today's post is the first of a two-part series about working with machine embroidery files.  If you're here for the sewing, I recommend skipping this post. 

Series Introduction

I'm going to pack a bunch of information into 2 parts.

Part 1 - Extracting files & Eliminating extra "nested" folders
This will highlight the 2 free programs I use and show a few screenshots on how to use them

Part 2 - Removing unnecessary file formats and My File Organization
This involves using built in Windows Explorer tools and my preference for directory and file structure

I know there are lots of ways to tackle unzipping and organizing your embroidery files, and that there are even tools you can buy to help.  I'm going to share the methods I prefer to use.  They're free, fairly efficient and should work on Windows XP/Vista/7.  If you have other methods or tips, please share your comments!  Also, it is tough to add enough details to be helpful without getting too in the weeds.  If there's anything you have a question about, please feel free to ask.

Disclaimer: There is potentially a risk to your computer when you download files and programs.  Please be responsible and make sure you use trusted sources, have an antivirus program installed, and scan any executable files before opening them.  Additionally, I have no vested interested in, or responsibility for, any tool I mention.

Extracting multiple zipped files

Since I tend to buy more than one file at a time, often from more than one site, my downloads folder ends up looking like this:


As you can see, there are multiple files, from multiple designers, all zipped.  My operating system automatically stores all my downloads into a single folder (named "Embroidery Downloads" for this post).  I used to right click on each zipped folder and select the "Extract All" option, choosing to extract it into the same folder it was originally downloaded to.  I got tired of doing this, especially when I had--literally--hundreds of files to unzip.  I knew there had to be a way to unzip them more easily.

Enter my solution:  a free program called "Extract Now".  I've been using it for a few months and love it.  I use it for more than just my embroidery files too.  It allows me to drag and drop all the files I want to extract, and outputs them to wherever I specify (though I still have them extracted back to my download folder). 

If you don't want to try this program, or read about it, skip ahead to the next section.  Otherwise, here is a quick demonstration of how to use it (after downloading and installing it).  First, double click on the shortcut to open up the program.  A window will open up that looks like this:


I like my folders to be unzipped back to the Downloads folder, so I change the settings to allow for that.  Click on the "Settings" button, and select the "Destination" tab.  Select the second option, "Automatically extract archives to:" and click "OK".  You don't have to change the information in the box (where it says {ArchiveFolder}\{ArchiveName}), just leave that.


Next, open up your download folder, and position it so that you can see both the ExtractNow program, and your zipped files.  Select all the files you want to unzip (you can use CTRL + A to select all the files in the folder or hold down Shift while selecting multiple files with your mouse).  Drag them over to the ExtractNow window and let go of your mouse button and you should see something like this:


The files to be unzipped are all displayed now in ExtractNow.  Click on the "Extract" button in the bottom right.


The program will show you the status as the files are unzipped and let you know if there are any errors.  If you realize you have more files to unzip, select the "Clear" button and drag more files over.  Otherwise, you can go ahead and close ExtractNow.

I like to verify the folders have been unzipped before I delete them.  It may be a bit tough to see in this picture, but I highlighted the unzipped folders, looked at the bottom left to see how many items were selected, then highlighted the zipped folders and made sure it was the same number.  If so, a quick press of the delete key and those extra zipped folders are removed to the Recycle Bin.


Eliminating "Nested" Folders

Once you have your folder unzipped, it's time to pull out the good stuff.  I'll cover deleting unnecessary formats (both the files and folder) next week.  This section shows how I use another free program to remove extra, "nested" folders.  If you're not sure what I mean by this, here are a couple pictures to illustrate.  When I open up one of the folders that I just unzipped, like this cute Pocahontas design from LynniePinnie, I don't see the design files.


Nope, I see another folder.  Hmm, double-clicking on that folder brings up these results:


There they are (in the folders for each size).  If you look at the file path at the top of the window, you can see it shows:
Embroidery Downloads > LP-Pocahontas > LP-Pocahontas

The designs are in a folder that's nested inside another folder with the same name.  This happens with files from several of my favorite digitizers and I don't want to click through extra folders each time I go to open a design.  My solution was to download a free program called Level Zap.  This will move all the files up one level, and remove the extra folder name.

After downloading and installing it, it's easy to use.  You just right-click on the extra folder (in this case, the second LP-Pocahontas folder), and select "Move content up and Zap"


It's the same effect as copying all the subfolders, navigating up one level, pasting them, and deleting the now-empty folder.  I prefer this method, and there's a confirmation before "zapping".


The end results:


Looking at the file path, you can see that there is one less folder and all is right with the world once again.

I hope this helped at least one person (it sure does take an awful lot of time to make these step by steps!).  Don't forget to tune in next Sunday for the second half--it'll be a good one, with an awesome, time-saving tip or three.  Or sometime before then if you want to see the pretty stuff I make :)


Saturday, November 24, 2012

Back With a Vengeance!

Hopefully I can live up to the hype I created for myself in the post title.  I do have a half dozen projects to share and 3 tutorials/tips related to machine embroidery.  If I can balance family,work and sewing/blogging the way I hope to, I should be posting more frequently for a bit :)

On to the good stuff.  It's a bit belated, but I want to share the shirt I made for Danielle for Halloween (sadly, Samuel never got one).  Here's my little "Candy Corn Cutie".

Yeah, it was that warm in October!

I know of at least 3 sites that have a version of this design, including Stitch On Time, but I was feeling adventuresome and decided to save a couple pounds by making my own design using files I already had.  I used:
I did a little bit of resizing/rotating of the little candy corns, but other than that it was really just layering the different bits together.  Here's what the mashup looked like in Embird:

The candy corn design from the Peace, Love, Candy Corn was actually the first t-shirt I embroidered for Danielle, two years ago.  I didn't get any great pictures of the design, but I had a lot of fun looking at pictures of her a few years ago and I'm going to include one anyways.

Look how little she was!


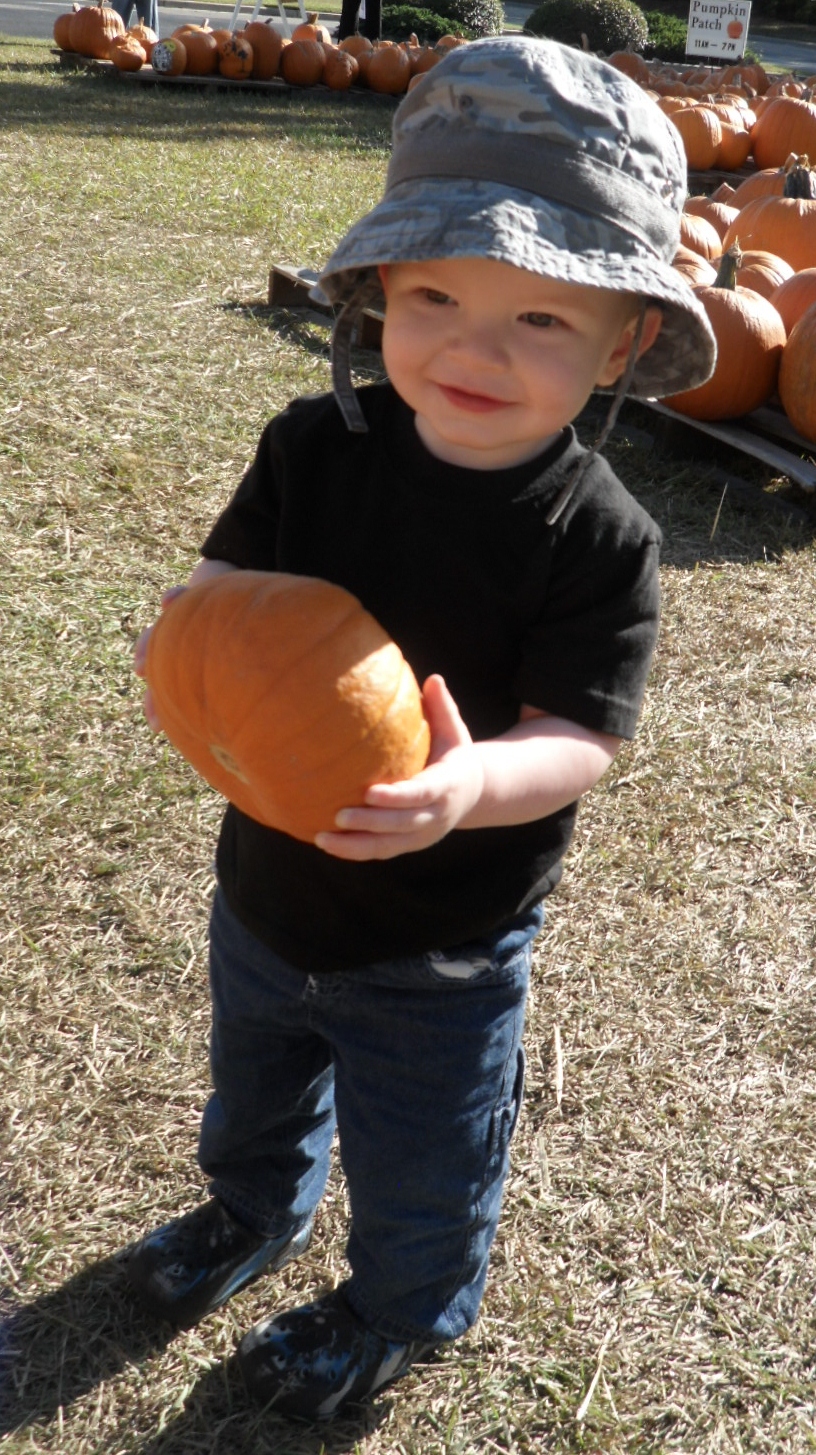
And, not to be left out, here's Samuel, in his non-embroidered shirt.  I don't feel too bad, I think he's pretty cute, even in a plain shirt :)

He picked himself out a
Samuel-sized pumpkin

I'll be back tomorrow--our Sunday mornings are filled with church, but that's followed up with my second favorite part of the day--naptime!

Thursday, October 18, 2012

Boo-tiful Nieces

I've made a few Halloween shirts this year and still have hopes of getting one done for Samuel.  This is the pair I made for my nieces.  My sister was sweet enough to share a picture of the girls wearing them to the pumpkin patch.

The shirts say it all :)


I used the "Bootiful" design from Planet Applique.  It stitched out nicely, as her designs always do, and I really like the fabric and color combinations.  My taste has been evolving and hopefully improving!


I embroidered on 5T shirts for the girls, who are 4, in the hopes that they can wear them next year as well.  

I used an old t-shirt (knit fabric) for the eyes

Funny story--I had a picture of these shirts in my head and got very excited to make them, only to discover that I didn't own this design!  Argg! I've got a ton of PA designs and can't believe I didn't have this one.  Obviously I do now :) 

Sunday, August 12, 2012

"H" Towels

I mentioned several months ago that I wanted to be on top of making presents this year.  Hahahaha.  Yeah, didn't quite work out.  My sister told me at Christmas time what she wanted for her birthday in May, and I managed to get her gift to her 2 weeks ago.  Thank goodness I have an understanding family.

It's a hanging kitchen towel.
In case it's not obvious.


She wanted some hanging towels with her last initial on them.  I was going to make towels with a topper on them, like the ones I made last year, but ended up going with a different style instead.  I used the the free instructions provided at Embroidery Library for "Topsy Towels".


The idea, of course, is that kids can't pull the towels down and they won't fall off.  The one main downside to this style is that you lose a lot of the length (because it's looped around the bar).  I do like the way it looks though.

The only other drawback is that they take a lot of time to make if you don't follow the directions.  The way the fabric should be laid out on the towel in relation to the design is like this:


This isn't a trick--the fabric you add goes on the BACK side of the towel.  The instructions mention this just fine. I, however, hurriedly scribbled down some notes in order to let my daughter watch "Bo on the Go" on my computer.  I ended up finishing the entire towel before I realized I had screwed up.  I salvaged it with a lot of fussing and seam ripping,managing to preserve all the work I had done on the L-shaped buttonhole.

See, when you flip the towel around the design
will be on the same side as the fabric.


I used the applique "H" from Planet Applique's font "Landon".  I didn't want something too feminine (her husband has a say in their decor) and I really wanted the triple bean stitch around the border of the letter, to provide some contrast and interest (there are a lot of browns in this towel, after all). 

I know what you're thinking, but the crookedness is part
of the alphabet--see the slant on the serifs?


My sister said she likes them, even though they weren't what we were originally planning.  I was supposed to just embroider an "H" on the fabric, but I didn't think it would be noticeable with all the contrasting shades of brown.  I'm still on the lookout for the perfect hanging towel style though, and welcome any suggestions!

Wednesday, August 1, 2012

Birthday Princesses

My nieces are turning four soon and I wanted to make them shirts for their birthday.  Their mama has planned a fun princess party, where the kids get to play dress up (she's even having capes for the boys to take home as party favors, how fun!).  She wanted something that said "Birthday Princess" and I just so happened to find a very appropriate design at StitchOnTime.

4th Birthday Princess design from StitchOnTime


I like the extras in this design that make it seem complete--there are multiple appliques and cute looking cut-out details in the crown and sparkles and stars scattered about.  I have to say the font stitched out beautifully--it was very well digitized with minimal jumps (I probably could have gotten away with not trimming most of them) and just so nice.

I did split the "th" and the other words in Embird so
that I could make them separate colors
 

The only other design I've stitched from this site is the reindeer I put on a scarf for my mom, but I think I will be frequenting the site more, even if the currency difference tricks me into thinking it won't cost so much (curse you pounds, in all contexts!)

Saturday, July 28, 2012

Bibs for Selah

Today I got the chance to celebrate my friend Candy's pregnancy at her baby sprinkle.  I have been sewing in quick spurts when I can (this whole time full-time job thing seriously gets in the way... ) and almost forgot to take pictures.  Luckily the soon-to-be-mommy-of-4 just left the bibs unattended while she was chatting with her other friends and I managed to snag some very last-minute photos. 

"Golden" font by 8Claws
Shabby Rose applique from PlanetApplique


This was my first time doing "shabby" applique and I love how it turned out, even if it did shed a bit.  I thought it would be quicker than regular applique, and it was, in terms of stitchout time.  But it's offset by the time spend clipping the edges.  I really like the effect, though, and would like to do some more of this type of design soon.


"Harlow" font by 8Claws
Redwork cross from DesignsByJuju


This was also my first time doing a "redwork" design.  I thought this would be faster too but it took foooorrrreeeevvvveeeerrrr.  I think by about the fifth time the machine stitched over the same lines I wanted to scream.  Granted, I was doing this around midnight the night before (hey, gotta grab the rare moments these days when I'm awake AND have the energy to work in my sewing room).  And though I didn't pick the designs with time as a consideration at all, I was kind of disappointed because I thought they would be quicker.

My beautiful friend Candy and
lots of diapers for baby Selah


I really had fun making these bibs.  I think they are my new favorite thing to embroider.  They're affordable, come in lots of colors, are easy to hoop and are just a great canvas for being creative.  I know I make it sound like I love everything I make, and sometimes it's just because I blog during the post-project glow, but I really like how these turned out!  It's so much fun (and a little scary) seeing how designs stitch out for the first time, and I will be adding "Harlow" and "Golden" to my list of fonts to use again!


Sunday, July 1, 2012

Got Milk?

I made some baby gifts for a friend a month ago, but wasn't able to get them to her until this past week.  Thankfully I made baby Jaxon's onesie in the 3-6 month size so it will still fit for a while.  His mama is a lactation consultant, so I manipulated the font "Skinny" from 8ClawsandaPaw to make the phrase "Got Milk?"


I compressed the "m" to make it look more like the famous phrase, took the curve off the bottom of the "t" and distorted the "?" from another font so that it fit in with the rest of the letters.  I compressed the "o" a little as well and the stitches are skinnier at the top and bottom, making it look a little off even though the widest stitches are the same size as the rest of the letters.  I will have to play around in Embird a bit more to even it out next time.

I also made a taggie and burp cloth for Jaxon:

Monogram done with "Cubed" font


I used satin & grosgrain ribbon for the tags, along with some satin blanket binding for the really wide cream ones.

I also used the blanket binding to add a "J" to the front of the taggie.


The front side is some leftover piggie flannel


I've been appliqueing a lot with my sewing machine now that I have one that can do a blanket stitch (and a satin stitch and a ton of other stitches also).  I made similar taggies to donate but put a heart on those and I'm finishing up some cute appliqued skirts for my nieces :)

Sunday, February 12, 2012

Frog Pillowcase

Whoo hoo!  I finally made something!  I finished up a pillowcase for my daughter, which brings me to a whopping total of 3 projects for the year (the other two were burpcloth sets for some friends at MOPS).  The best part of the project--besides how excited Danielle will be when she sees it--is that my sewing mojo is back.  Now maybe I can knock out a bunch of projects on my to do list.

In case you don't remember from this post, I merged two designs from Designs By Juju together and added some words using the font Puppy Love.  I stitched the design in a 5x7 hoop, then pieced a border out of squares that ended up being 3.5" x 3.5" once they were sewn.  I used fabrics from my stash to match the colors in Danielle's bedding & curtains.

Frog pillowcase & butterfly sheets?  Works for me :)


She uses a travel sized pillow so the finished dimensions were 20.5" x 14".  The pillow was just a smidge longer than that, but I didn't want to make the math more complicated and pillows squish anyways.

See, nice and snug


The placement of the squares took forever, ugh.  I wanted a different color in each corner, at least 3 or 4 squares between color repeats, and I didn't want a pink or brown to be in the center bottom (the brown would be overwhelming, and the pink would be too much with the pink lilypad above it).  Yeah, I nuked the placement out, but I am pleased with the visual weight of the colors.  For the back I made an envelope-style that overlaps. 

It doesn't lay as flat as it should, because of the snug size,
but there's plenty of overlap so the pillow doesn't show.


As for the design--the end result stitched out nicely even with the manipulations, so I am ready to sew it on some shirts for my nieces now.  I almost forgot to add an extra piece of stabilizer (to prevent puckering), but I stuck one on in time for the words, whew!

Closeup of the froggie


Related Posts Plugin for WordPress, Blogger...